In almost every underwater photography class I teach, when the subject is lighting and strobes students are quick to ask a question regarding how many strobes they should use. My answer usually comes in the form of a question, or several questions. That’s the way I teach. I want students to think about the potential answers and my reasons for answering the way I do instead of trying to memorize my answer and simply accepting it.
So, let’s start the discussion with this question: What do strobes do for you, or why use a strobe, or strobes, at all? If asked that question, most students are quick to say that a strobe provides you with light so you can expose the foreground elements in a photograph. Hopefully, they are aware that if the water in the background of a shot is lit, it is lit by the sun and not by light from a strobe. Light from a strobe only impacts elements in the foreground of scenes, and those elements need to be no farther than 8 or so feet away from the camera.
A second very important benefit that comes from using a strobe is that light from a strobe “paints-in” colors that might otherwise be lost, into foreground elements. This “painting-in” of lost colors is especially true of those hues near the red end of the visible spectrum.
At this point a quick review of sunlight is useful. The sun emits what we think of as white light. In simplistic terms, white light is comprised of equal amounts of red, green and blue light waves.
As we all learned in our basic certification classes, water is a selective filter of the visible spectrum of light. And, as we descend or as light waves from the sun go deeper and deeper, various colors get filtered out. Colors on the red end of the spectrum are the first to go, and by the time we get 80 to 100 feet deep the underwater world becomes a world painted over with a bluish cast as other hues are lost to significant degrees. Our brains try to compensate, and to some extent they do, but a camera simply records what is there to be seen.
Collectively speaking, strobes are made to emit white, or near white, light. By doing so light from a strobe can “paint-in” colors that would otherwise get filtered out by the water column if you depended on sunlight alone to light your scene.
But, and this is a big “but”, strobes can only “paint-in” those otherwise lost colors if the strobe is close to the foreground elements in a scene. That is one of the main reasons we hear the mantra “get close” in underwater photography. Light emitted by a strobe is also selectively filtered out as it passes through water. This means that too little strobe light striking your subject often results in your subject having a bluish cast.
When it comes to the subject of “how many strobes you, or any underwater photographer should use”, two other considerations come into play. One is that light, whether it comes from the sun, a strobe or strobes, or a combination of sunlight and strobe goes a long way toward creating the ambiance, or mood, of a photograph. When we start our pursuit of underwater photography we are usually taught to place our strobe above and to the side of our subject. We place the strobe higher than our subject so that our photographs look natural to us. Whether outside or inside, light sources are almost always placed above us in our daily lives. This means that shadows are cast below our subjects. Our brains use this information to help us orient to our surroundings. We usually want to try to mimic the light above/shadows below look in our photographs to help viewers orient to our images.
And we place our strobe, or strobes, to the side of our subjects and away from our lens to minimize backscatter.
This strobe above and to the side positioning creates what I think of as a documentary look.
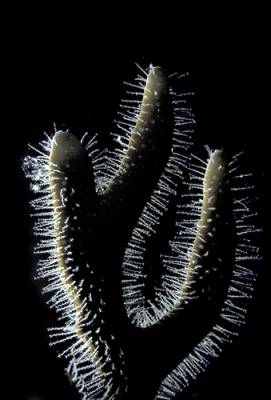
But there is nothing set in stone that requires you to use that lighting technique. Here is an example of backlighting, a technique in which a strobe is placed behind a subject. In this case the backlight helps make the stinging apparatus of the pictured fire coral standout, and it creates a significantly different mood than the documentary look.
At this point we have covered the basics of what strobes do for us. Now let’s consider the one strobe vs. two strobe question. When students ask me about this, I ask those shooters that are using a single strobe to tell me why they might want to use two strobes. I want them to give me a more well thought out answer than “a lot of other shooters do”.
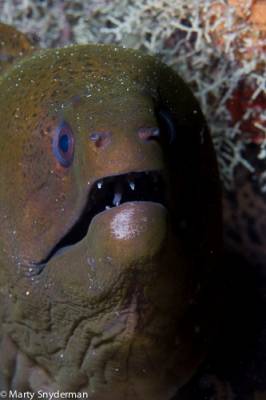
My reasoning for adding a second strobe to a camera system is that the use of a single strobe often leads to important details “getting lost” in the darker parts of scenes. That’s what happened to the details on the left side of the eel’s face (on your right) in this shot. Light from the single strobe that was placed above and to the opposite side of the eel’s face was blocked by the eel’s face. The eel was in a hole and there was not enough sunlight to light up the opposite side of the eel’s face, and as a result, the details on that side of the face and those in the crevice are lacking.
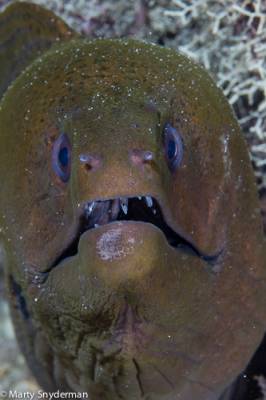
Some people like the dramatic effect that can be created through the use of a single strobe. In some instances it can be hard to argue against them, but in this case I prefer the two-strobe shot that follows.
In this two-strobe shot you can see some details on both sides of the moray’s face.
In essence, I used the second strobe to “soften”, or in this case to eliminate most of, the very dark shadow areas so that viewers can see details in those areas.
Both strobes can be set to the same power, or the strobe that lights the shadows can be set to a lower power. This lighting ratio often helps to create the illusion of a three-dimensional look in what is actually a two-dimensional photograph.
What is important is to prevent either strobe from over-exposing important elements in the shot.
We hope you enjoy and benefit from the information presented here, and we hope to see you back again in a couple of weeks. If you did benefit from this blog, please tell a friend about it.
Thank you,
Marty Snyderman For the Vivid-Pix Gang
We hope that you’ve learned how to Take Better Pictures.
Click Here to receive a Free Trial of Vivid-Pix software and Make Better Pictures: www.vivid-pix.com

